Monday, July 28, 2008

Common tasks with Subversion

Part 3 of an n part series.

General workflow for version control

The following descriptions all use TortoiseSVN and Explorer. The steps can also be done using other Subversion clients such as DelphiSvn or JCL.

The general workflow for changing code is:
  1. Update. Right click on your base development folder and choose TortoiseSvn -> Update.
  2. Resolve conflicts
  3. code like a demon...
  4. Test, test and test
  5. Update (again). As 1, just in case someone else has changed things
  6. Resolve conflicts (again)
  7. Add (also Delete and Ignore as required)
  8. Commit
Notes:
  • Solo developers can normally leave out steps 1,2,5,6
  • Steps 7 and 8 can be combined (check the "Show unversioned files" box in the commit dialog)
For a solo developer, the process essentially comes down to
  • Commit. Do Adds, Deletes etc from commit dialog
Now isn't that easier than zipping up all your source code and archiving it.

Traps for young players
  • Deletes and (particular) Renames should be done from within Explorer/Tortoise.
  • Do commits from the base directory where possible. If you commit further down the tree, then you need to do an update before you can commit from the base.
(Edit) Team Version Control
One thing I didn't point out first time round (thanks Lars).
The golden rule of team version control:
Only check in working code to the trunk.
If you are working it a team environment, and you want to commit non working code then create a branch. That will let you have all the benefits of version control without annoying everyone you work with. Once you have completed your changes, merge your changes back into the trunk. See the manual for details.
Also, Sean's rule number 2 (for team programming):
Always update before you commit ()
If you commit without an update first, the code in the repository may not be the same as your code. That means that you don't know that the tests pass, and the code still compiles.

E.g. Bob changes the signature of DoSomething to take an extra parameter. It's in a file that you haven't touched, so there are no conflicts. All of your code uses the old signature so when you commit, it won't compile any more.

If you update first, you can catch the problem and avoid making a fool of yourself. This sort of scenario can be quite common with larger teams. Don't ask me how I know.

Manual
All Tortoise commands are available from the Explorer context menu. See here for the manual.

Saturday, July 26, 2008

Subversion server options

I didn't cover subversion servers in my last post as I don't use one any more. However there have been some queries so here are a few ideas:

Windows installers
VisualSVN Server
official Svn 1-click setup
Other OS

VMWare appliances
Subversion and WebSVN on Ubuntu Server
SVN VM
vmTrac

Online hosting
Cvs Dude
Google search

I am not endorsing any of these. However, if I needed a server, I would probably go with one of the online solutions.


Monday, July 7, 2008

Starting out with Delphi and subversion

I am always disturbed by the number of programmers I run into who don't use version control. A version control system (VCS) is one of the fundamental tools of a programmer, up there with the ide/compiler, bug tracking and backups.

Subversion, together with the TortoiseSvn plugin for Explorer, is one of the better free VCS solutions available. What follows is a quick guide to setting it up the easy way.

Note: This setup is not suitable if you have a large number of users, or need to provide access across the internet.

Tortoise and Subversion

Subversion is the actual VCS. Typically you would run it as a service and then connect to it with client software such as Tortoise.

Tortoise adds context menus and icon overlays to Explorer allowing control of the VCS. These menus and overlays are also available in programs that use the Explorer menus and icons such as the Delphi File Explorer.

Other clients for Subversion are also available.

If you only have a limited number of users, and do not need remote access, you can use Tortoise without a subversion server. This makes set-up much easier. I am not going to cover setting up the server here, primarily because I haven't used one for 3 years.

My file structure

I have 2 base folders, D:\dev and d:\devother.

D:\devother\ is used for files that are use different version control settings (ie open source projects that I update from their repository such as tiopf).
D:\dev\ is used for everything else; my code, third party components, images etc. Having everything under one folder makes version control easier.

I recommend moving all source under a single base folder, if it is not already. If you have source on a network share, move it into a base folder on a local drive. If you need to share source, place the repository on a shared folder.

Repository

The repository is where the versions are stored. It has a directory structure similar to a file structure.

The subversion book recommends having the following directories at the repository root

/branches/
/trunk/
/tags/

With this layout, your main development takes place under /truck/. Branches and tags go where you would expect. I don't do a lot of branching and tagging, when I do I place the branch directories along side the main project directories instead. Therefore I don't bother with the initial directories and create branch directories as required.

My layout is more like

/components/
...
/projects/
/projects/project 1 v1/
/projects/project 1 v2/
...

This maps to my file structure of

d:\dev\
d:\dev\components\
...
d:\dev\projects
d:\dev\projects\project 1 v1\
d:\dev\projects\project 1 v2\
...
etc

It is reasonably easy to change from one repository layout to another if you change your mind, so choose whichever structure makes sense to you..


Setup
  1. Download and install Tortoise from here.
  2. Open Windows Explorer
  3. Create an empty folder to serve as your repository. This can be local or on a network drive. The location needs to be reasonably safe and easy to back up.
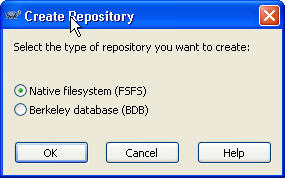
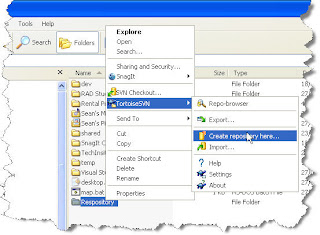
  4. Right click on the folder and click on "Create repository here"
  5. Choose "Native filesystem"
  6. If you want to set up /branches/, /tags/ and /truck/ directories, right click on your repository folder and choose TortoiseSvn -> Repo-browser. Right click on the root directory and choose "Create Folder" for each of the initial directories.
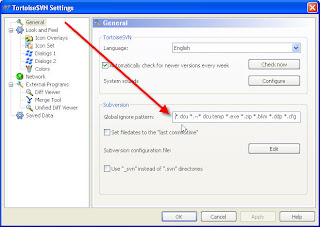
  7. Right click on any folder and choose TortoiseSvn -> Settings
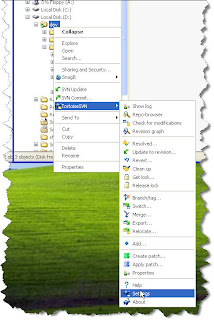
  8. In the Global ignore patterns, enter in the file types that should be ignored by default. Ie things like map files that will (almost) never need to be under version control. I use "*.dcu *.~* dcu temp *.exe *.zip *.bkm *.ddp *.cfg *.dof *.dsk *.ini *.hlp *.gid *.bmp *.png *.gif ~* *.log bin debug release *.map *.chm *.bkf Thumbs.db *.mdb .obj *.elf *.stat *.ddp *.bpl *.map *.GID *.hlp *.opt *.dll *.raw *.BIN *.obj *.pdb *.scc Debug Release *.xml obj *.~* *.backup *.INI *.ArmLog *.KeyLog *.NanoLog *.Stats *.PreARM *.old *.drc *.*~ *.doc *.pdf *.bmp *.jpg *.MRW *.NEF *.ORF *.psd *.X3F __history *.local *.identcache *.bak Thumbs.db *.ldb *.dex *.rar DllDcu *.lck CVS cvs *.txt *.TXT *.jdbg *.HLP *.KWF *.xls *.cnt *.dsm *.dti *.tmp *.lnk *.cbk *.mes"
    Note that the patterns are case sensitive.
Initial Import
  1. Back up your source code!
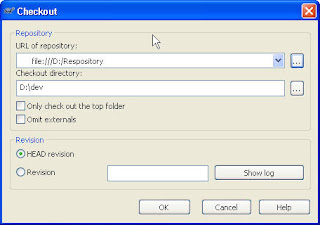
  2. Right click on your base development folder (I use d:\dev\) and click on "SVN Checkout"
  3. Click on the browse button beside URL and navigate to the repository directory (if you have set up a /trunk/ directory, navigate to this).
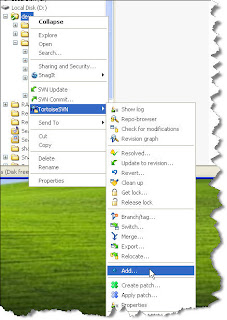
  4. Right click on your base development folder (d:\dev\ in my case) and choose TortoiseSVN->Add.
  5. Wait for the Add dialog to populate. The first time it is used, it can take a while to populate. Work your way down the file/folder list.
    If there is something you don't want to add now, uncheck the selection box.
    If you never want to add it, right click on the item and choose "Add to ignore list"
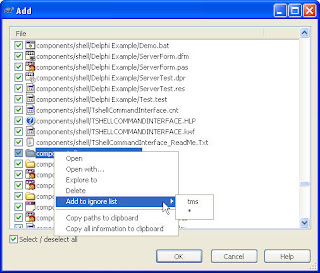
  6. Once you are happy with the selected files and folders, click OK.
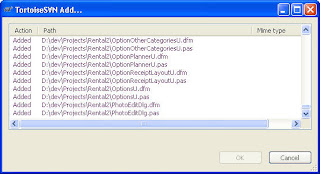
    The files are now all added to version control. However they have not yet been saved (committed).
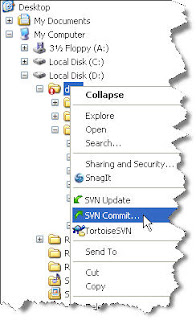
  7. Right click on the base development folder again and choose Commit.
  8. Provide a message.
  9. Uncheck any files you don't want to commit at the moment and click OK.
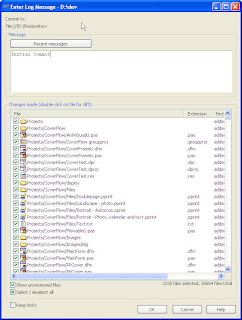
Your files are now under version control. You can revert to any version, perform diffs, see what files are changed and perform all other sorts of good things.

Version controlled files are marked to indicate their status. A full list is given here. The main ones are
  • Committed: Check mark
  • Added: +
  • Changed: !
  • Deleted: x


To come
I will do followup posts explaining
  • How to work with files on an ogoing basis
  • Various delphi integration options

Links
Subversion http://subversion.tigris.org/
Subversion book http://svnbook.red-bean.com/
Tortoise http://tortoisesvn.tigris.org/

Saturday, June 21, 2008

ti Object persistance framework updated

What's up?

v2.50 of tiOPF is now available at http://tiopf.sourceforge.net/

So what's tiOPF?

tiOPF is a Object Persistence Framework. That is, it is a framework based around saving your objects to, and loading them from, databases and/or flat files. See the overview for more details.

In a nutshell it lets you do things like:

var
user: TMyuser;
userList: TUserList;
...

user:= Tuser.CreateNew;
user.FirstName:= 'Sean';
user.LastName:= 'cross';

user.Save;

...
userList:= TUserList.Create;
userList.Load;

for user in userList do
...


tiOPF handles the saving and loading of objects to databases and flat files. You can swap between databases by initialising a new persistence layer.


Why should I care?

  • tiOPF lets you code in objects rather than datasets (you can still use data aware controls though). This gives you more object orientated code
  • tiOPF provides database independance
  • Better code reuse. Because the persistance is separated out, you can use the same code across different databases and structures
  • Easier unit testing (in my experience anyway). I find it much easier to setup objects and test them that to setup databases and test.

Links

Home page: http://tiopf.sourceforge.net/
Overview: http://tiopf.sourceforge.net/Doc/overview/index.shtml
Newsgroups: http://tiopf.sourceforge.net/Support.shtml

Thursday, June 12, 2008

" Connection is busy with results for another hstmt"

One of the problems with working on the same program for years, is that you always end up paying for your sins. In my case the sin in question is still using the bde and odbc.

"Connection is busy with results for another hstmt" is a common error when connecting to ODBC databases. It occurs because an OBDC connection can only have one active cursor at a time. By default, odbc only retrieves the first 20 records for a query. If the query contains more than 20 records, the rest are retrieved on demand. That's all very well, but when you open a second query using same connection/session you get the dreaded hstmt error.

I thought I had beaten it years ago, but my latest set of changes have resulted in the error reappearing.

There are a few possible solutions to this error:

  1. Use TTable components. These don't have the error as they open a new connection each time. Not a very pretty solution :(
  2. Put a FetchAll after each Open. This forces the retrieval of all records. Not practical in my case as I have around 250 tquery components to check.
  3. Use multiple connections. Also not practical for me.
  4. Replace the BDE with something else that doesn't have the problem. In progress but...
  5. Cheat. Set the odbc rowset size to a larger number. If you set it to 200, then the first 200 records will be returned. If you set it to -1 then ALL records will be returned. This could have dire effects on performance if your queries return a lot of records.
This time round I discovered, and went with option 5.

To set the rowset size with the BDE, do the following:
  1. Click on your TDatabase component
  2. In the object inspector, expand Params
  3. Put in a Key of "ROWSET SIZE"
  4. Put in the desired value
Changing the rowset size should work with other odbc connection components as well.

Update: As Otto has pointed out, the error can also be resolved, if you are using sql server 2005 or later, by using the SQL Native Client drivers. See Multiple Active Record Sets for more details. Doesn't help me though :(

Sunday, June 8, 2008

Coverflow update

TMS GUIMotions

TMS Software have released their 3d animation component, GUIMotions. It includes a number of animations including a coverflow effect. More info is available here.

My GLScene example

I have updated my coverflow example. I have included mirroring, multiple rows, vertical layout and a few other changes making easier to be reused. I have also shown how to use standard vcl controls.

You can download the latest version from here.


Using an editable TMemo control


2x2, Transitioning from horizontal to vertical layout


Vertical layout, 2 across


Horizontal layout 2 across

Links
GuiMotions
GLScene coverflow demo
GLScene

Friday, May 16, 2008

Coverflow example using Delphi and GLScene

Problem
I am beginning work on Pics Print 4. One of the things I want to do with this release is make it significantly more slick. To that end, I thought "Coverflow". See here for an example

The trouble is that there is not that much in the way of delphi examples. I did find "Flying Cow", which is a Delphi implementation using OpenGl.

Flying Cow
Flying Cow is a clone of Cover Flow written by Matías Andrés Moreno (http://www.matiasmoreno.com.ar/ website currently down)

Changes to make Flying Cow compile under D2007, and download links, are listed in http://www.aqua-soft.org/board/showthread.php?t=46566 (website currently down as well)

Flying Cow looks quite nice. However it has one huge drawback from my point of view, it uses the GPL and is therefore unsuitable for my use.


Flying Cow implementation


GLScene implimentation
I have created my own version using GLScene. Considering that I haven't done any 3d work since 2005 (on a pda using C++ at that), it was remarkably easy to get going without cracking open my OpenGL books.

Here is the result:


Basic layout


Showing 2 images across, and using transparency on mouseover to show hidden images.


Now with added mirroring goodness


Now with vertical layout, showing 2 across and 2 down

You can download my source and the executable from here. It is written in D2007 but should be easily portable to earlier version (there may be a for ... in loop or two but that is about it).

This is prototype code, not production code so be warned. I take no responsibility if it eats your homework, backchats your mother-in-law or transfers all your money into my bank account. On the plus side, it has a promiscuous license so you can use it in your own apps without problems.

If you make any improvements, let me know and I will update source accordingly.

Update
Mirroring added

Update 2 - May 30
Code changed to use an object list instead of an array, removed Graphics32, given optional vertical layout, allows multiple rows, and demonstrates removing pages.

Links
Javascript implimentation
http://flashloaded.com/flashcomponents/photoflow/example1.html

Flying cow discussion thread
http://www.aqua-soft.org/board/showthread.php?t=46566

GLScene
http://glscene.sourceforge.net/wikka/HomePage

My version
http://www.sourceitsoftware.com/download/delphi/CoverTest.zip