I am always disturbed by the number of programmers I run into who don't use version control. A version control system (VCS) is one of the fundamental tools of a programmer, up there with the ide/compiler, bug tracking and backups.
Subversion, together with the TortoiseSvn plugin for Explorer, is one of the better free VCS solutions available. What follows is a quick guide to setting it up the easy way.
Note: This setup is not suitable if you have a large number of users, or need to provide access across the internet.
Tortoise and SubversionSubversion is the actual VCS. Typically you would run it as a service and then connect to it with client software such as
Tortoise.
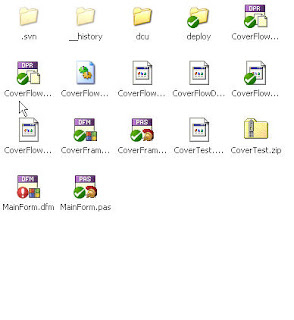
Tortoise adds
context menus and
icon overlays to Explorer allowing control of the VCS. These menus and overlays are also available in programs that use the Explorer menus and icons such as the Delphi File Explorer.
Other clients for Subversion are also
available.
If you only have a limited number of users, and do not need remote access, you can use Tortoise without a subversion server. This makes set-up much easier. I am not going to cover setting up the server here, primarily because I haven't used one for 3 years.
My file structureI have 2 base folders, D:\dev and d:\devother.
D:\devother\ is used for files that are use different version control settings (ie open source projects that I update from their repository such as tiopf).
D:\dev\ is used for everything else; my code, third party components, images etc. Having everything under one folder makes version control easier.
I recommend moving all source under a single base folder, if it is not already. If you have source on a network share, move it into a base folder on a local drive. If you need to share source, place the repository on a shared folder.
RepositoryThe repository is where the versions are stored. It has a directory structure similar to a file structure.
The subversion book recommends having the following directories at the repository root
/branches/
/trunk/
/tags/
With this layout, your main development takes place under /truck/. Branches and tags go where you would expect. I don't do a lot of branching and tagging, when I do I place the branch directories along side the main project directories instead. Therefore I don't bother with the initial directories and create branch directories as required.
My layout is more like
/components/
...
/projects/
/projects/project 1 v1/
/projects/project 1 v2/
...
This maps to my file structure of
d:\dev\
d:\dev\components\
...
d:\dev\projects
d:\dev\projects\project 1 v1\
d:\dev\projects\project 1 v2\
...
etc
It is reasonably easy to change from one repository layout to another if you change your mind, so choose whichever structure makes sense to you..
Setup- Download and install Tortoise from here.
- Open Windows Explorer
- Create an empty folder to serve as your repository. This can be local or on a network drive. The location needs to be reasonably safe and easy to back up.
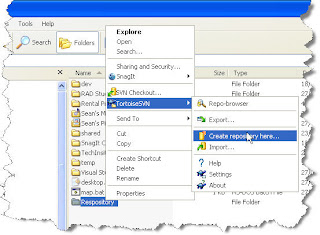
- Right click on the folder and click on "Create repository here"
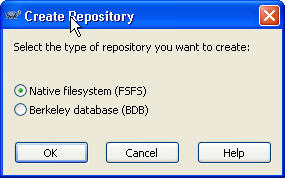
- Choose "Native filesystem"
- If you want to set up /branches/, /tags/ and /truck/ directories, right click on your repository folder and choose TortoiseSvn -> Repo-browser. Right click on the root directory and choose "Create Folder" for each of the initial directories.
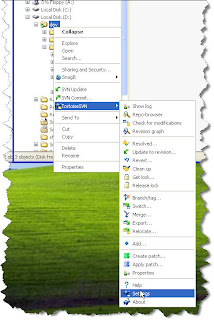
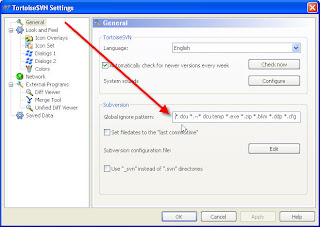
- Right click on any folder and choose TortoiseSvn -> Settings
- In the Global ignore patterns, enter in the file types that should be ignored by default. Ie things like map files that will (almost) never need to be under version control. I use "*.dcu *.~* dcu temp *.exe *.zip *.bkm *.ddp *.cfg *.dof *.dsk *.ini *.hlp *.gid *.bmp *.png *.gif ~* *.log bin debug release *.map *.chm *.bkf Thumbs.db *.mdb .obj *.elf *.stat *.ddp *.bpl *.map *.GID *.hlp *.opt *.dll *.raw *.BIN *.obj *.pdb *.scc Debug Release *.xml obj *.~* *.backup *.INI *.ArmLog *.KeyLog *.NanoLog *.Stats *.PreARM *.old *.drc *.*~ *.doc *.pdf *.bmp *.jpg *.MRW *.NEF *.ORF *.psd *.X3F __history *.local *.identcache *.bak Thumbs.db *.ldb *.dex *.rar DllDcu *.lck CVS cvs *.txt *.TXT *.jdbg *.HLP *.KWF *.xls *.cnt *.dsm *.dti *.tmp *.lnk *.cbk *.mes"
Note that the patterns are case sensitive.
Initial Import- Back up your source code!
- Right click on your base development folder (I use d:\dev\) and click on "SVN Checkout"
- Click on the browse button beside URL and navigate to the repository directory (if you have set up a /trunk/ directory, navigate to this).

- Right click on your base development folder (d:\dev\ in my case) and choose TortoiseSVN->Add.
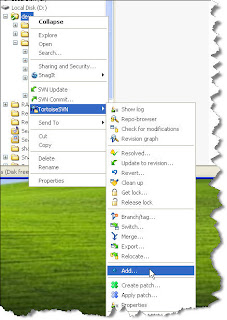
- Wait for the Add dialog to populate. The first time it is used, it can take a while to populate. Work your way down the file/folder list.
If there is something you don't want to add now, uncheck the selection box.
If you never want to add it, right click on the item and choose "Add to ignore list"
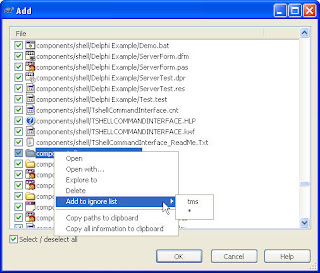
- Once you are happy with the selected files and folders, click OK.
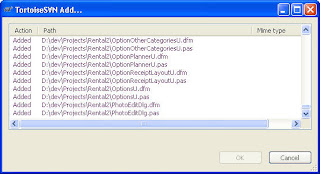
The files are now all added to version control. However they have not yet been saved (committed). - Right click on the base development folder again and choose Commit.
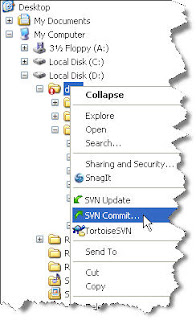
- Provide a message.
- Uncheck any files you don't want to commit at the moment and click OK.

Your files are now under version control. You can revert to any version, perform diffs, see what files are changed and perform all other sorts of good things.
Version controlled files are marked to indicate their status. A full list is given
here. The main ones are
- Committed: Check mark
- Added: +
- Changed: !
- Deleted: x
 To come
I will do followup posts explaining
- How to work with files on an ogoing basis
- Various delphi integration options
LinksSubversion
http://subversion.tigris.org/Subversion book
http://svnbook.red-bean.com/Tortoise
http://tortoisesvn.tigris.org/


